5 Odyssey templates to inspire your next campaign
Last updated: October 7, 2024

Odyssey — Omeda’s marketing automation platform — helps you give your audience the customized, cohesive experiences they expect across email, website and ads.
But effective campaigns have a lot of moving parts. And if you’re just getting started on Omeda, organizing all these elements at once can be intimidating.
That’s why we’ve created step-by-step templates for our clients’ most frequently used campaigns, including:
Check out the Email Engagement Report for the latest benchmarks & best practices
- Converting Anonymous to Known
- Welcome Series – Branched
- Re-Engagement V1 – Valid Email
- Re-Engagement V2 – Invalid Email
- Cross-Promotion
Use these templates to get your campaigns up and running ASAP. That way, you can spend more time where it really really counts — creating the content you need to connect with your audience.
In this post, we’ll walk you through each template and help you make the most of each one. Read on for more:
5 Odyssey templates to inspire your next campaign
Converting Anonymous Visitors to Known
In this voyage, you’ll serve each of your anonymous website visitors with personalized content, then prompt them to sign up for your newsletter after a certain amount of time.
Goal: Engage your anonymous website visitors in order to convert them to known leads and readers.
Purpose: Target users who are interacting with your content but not providing their information. If you don’t want to gate your content, this is a great way to build up your audience profiles and use the information provided to improve their experience through more personalized content and offers.
This also gives anonymous users an easy way to opt out of future marketing communications, allowing you to focus your resources on opt-ins.
Length of Campaign: ~1 week/person
Campaign Type: Continuous (Note: Continuous voyages are run at the frequency of your choosing. The audience refreshes every time you run the campaign).
Summary:
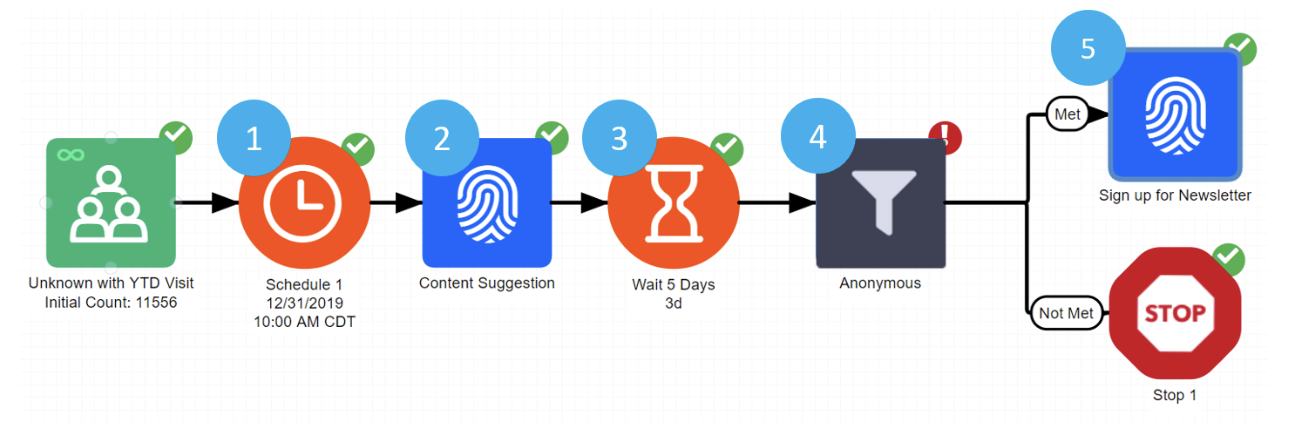
- Audience: In Audience Builder, query your audience for anonymous website visitors. Consider limiting your search to those who have recently engaged with your website and/or engaged X times within a specific date range. For best results, build a separate Odyssey for each of your brands.
- Schedule: Set the date/time of the first set of contacts that you will target through this voyage. If you set this voyage to run continuously, this will also be used to refresh the campaign automatically at your desired frequency (i.e., once a week, once a month).
- Content Suggestion: Start by giving your unknown audience something of value – a popular piece of content, an article or a white paper. When they visit your site, they’ll be served a personalization (pop up) with the suggested article inside. (Learn more about personalizations on Omeda here.)
To collect their information, make sure you require some sort of signup from them before they access it. For design inspiration, check out our Suggested Content HTML template.
Note: Consider filtering anyone that provides their information (i.e., becomes known) into a welcome series at this point. - Wait: Give your audience a few days to discover your recommended content before asking them to sign up for your newsletter.
How long should you wait between elements? This depends on how often anonymous visitors come to your page. If they visit several times in a month, you can use faster wait times (3-5 days). If it takes them longer to come back, let this sit longer.
- Filter: Once the wait is completed, set up a filter to separate your audience into two paths: those that did not sign up to access your suggested content (and are still anonymous) and those that did (and are now known).
Your Odyssey will stop for your known audience, as they’ve already met your goal. Your still-anonymous audience will proceed to Step 6, where they’ll be prompted to sign up for your newsletter the next time they visit your site.
Note: Depending on your business model, you can also choose to filter those who viewed your suggested content, but didn’t sign up to access it, over to a meter. This group has a higher chance of coming back to your site a second or third time, so they’d be a good target audience for a registration /paywall. - Personalization: Finally, ask your still-anonymous audience to register for your newsletter via a personalization that fires on your website. Consider a more aggressive personalization type, like a standard modal popup (which takes up the screen), or a persistent header/footer (which “sticks” to the header or footer as someone scrolls).
In this pop-up, users can sign up, then proceed to a preference to select their preferred topics or sending frequencies.
To maximize submissions, capture your audience’s contact information (name and email address at minimum). Also embed one of our Dragon Forms directly into this personalization so the user can sign up straight from the popup.
PRO TIP: Make sure you restrict by URL in order to prevent this from firing across all your websites
How will I know if my voyage was a success?
Use the standard # of conversions from anonymous to known in a set time (e.g. month, quarter) as a baseline indicator for your campaign. If you see an increase in conversions while running this campaign, it’s working!
Not happy with your numbers? Try tweaking the following:
Make your audience more (or less) inclusive. Consider targeting people with a higher or lower number of total website visits, or extending your time range.
Experiment with your timing elements to see if you need to let things sit longer (or shorter) between runs.
Change your content mix. If you’re not recommending the right pieces to your audience, you definitely won’t get responses. Use Omeda’s website analytics solution to see how your suggested pieces are performing with your anonymous audience in particular. If your numbers are flat, experiment with new pieces. For best results, promote pieces with proprietary research, expert insights and differentiated information your audience can’t Google themselves. (Get your gated content right with our best practices here!)
Already using meters? See which of these pieces get the most conversions and consider using these in your unknown-to-known campaign.
Review the reports for each of your personalizations, paying close attention to the number of clicks, impressions, and conversions. Make sure that they have a 1) Clear CTA, 2) audience-appropriate messaging, 3) placement of personalization and 4) general design. Some other tweaks to consider:
- Display your personalization more or less frequently. On Omeda, you can run personalizations anywhere from once every three hours to continuously. Our research shows that you can double or even triple your click rates just by changing the frequency of a personalization. So test your personalization frequency rate to see what resonates with your particular audience.Odds are that they’ll either respond to a very frequent or very hands-off cadence, based on our aggregate data, but it ultimately depends on your audience. A caveat, though: If you’re erring on the side of triggering personalizations more frequently, make sure your targeting is super precise so the message is relevant to each person (and use our tools for that).
- Change your personalization type. Some personalization types are more disruptive to the user experience than others. According to our research, this has a direct impact on conversions, as full-screen standard modals have nearly triple the click rate of other personalization types (scroll trigger, exit intent, etc.)
- Include less or different fields on your forms. If you ask your audience to complete 10 questions just to read an article, all but your most committed readers will click out instead.
Review your reports to see whether form abandonments are hurting your campaign: If your suggested content is getting a lot of traffic, but your form submissions aren’t keeping pace, consider shortening your form. (We recommended no more than 3-5 required fields.)
Also consider changing your required fields. If your users aren’t willing to hand over their email at first, consider changing it to name and country (and make email optional for now). .
2. Welcome series (branched)
In this series, you’ll send your new subscribers three emails introducing them to your brand and content (you’ve also got the option to reach them via FB/IG ads and website personalizations). Mid-campaign, you’ll split your audience into narrower groups so you can personalize content for their specific needs and drive deeper engagement.
Goal: To engage with new subscribers and encourage them to continue interacting with your newsletter/publication. You can promote your brand as a whole or lead them to a specific action, like signing up for an event or a paid subscription.
This campaign consists of three emails introducing the user to your brand and providing them with helpful resources (along with optional ad and website targeting).
Purpose: To engage with a new subscriber and welcome them to the newsletter/product that they recently subscribed to.
Length of Campaign: ~1 week (adjust to 2-4 weeks as needed)
Campaign Type: Continuous
Summary:
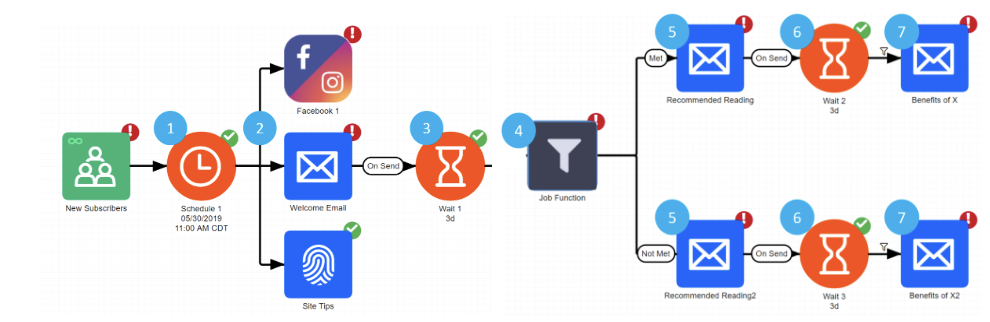
1. Audience: In Audience Builder, query the contacts who have recently subscribed to your newsletter or publication.
You can exclude those who opted in for daily emails and/or run it concurrently with their daily emails. If you choose the latter, we strongly recommend running this campaign a few hours after their daily email in order to reduce spam complaints and deliverability issues. (Also use Omeda’s fatigue filter to temporarily pause sends to recipients that have stopped engaging.)
2. Schedule: Set the date/time of the first set of contacts that you will push through this Odyssey. If you’re running a continuous voyage, this will also be used to automatically re-run subsequent campaigns at your desired frequency.
3. Email #1 / Personalization / FB-Instagram: Send an initial email thanking your new user for subscribing and welcoming them to your brand.
In this email:
- Humanize your brand. Consider writing a welcome letter from the team to provide a personal touch.
- Emphasize your value proposition by talking about your history and expertise in the space. Also include social proof – like a testimonial, your subscriber numbers or any industry awards — if you have space.
- Mention other resources outside your website, like any webinars, events, or subscriber-exclusive courses or communities (Bonus: link to your past content to nurture your audience’s interest and get them reading right away ).
- Include whitelisting information. Gmail and other ISPs may filter your emails to your audience’s promotional emails if they haven’t engaged with your brand in the past. Avoid this by asking your audience to add you as a trusted sender or drag your emails into their primary inboxes. This ensures that you’ll always appear in their main inboxes and get as much visibility as possible.You can also serve your audience with Facebook/IG ads and website personalizations at this stage.On FB/Instagram, promote an article or whitepaper that your new subscriber may find appealing. Use your website personalization to guide readers toward different areas of your site, like as FAQs, Special reports/whitepapers, and/or general website use. This helps orient your readers to your site and gets them in the habit of visiting more regularly. If your site works best with a specific browser, note that here too.
4. Wait: There is nice flexibility here with this element, depending on how long you’d like your total campaign to run. You can set the wait to be a few days up to a week. We recommend 3-5 days so that you don’t trigger email fatigue but are still consistently visible for the new subscriber.
5. Filter: To make your content more customized, you can choose to filter your recipients into two or more segments where they each receive more relevant content. (You can add extra filters at this point, or, if you want to run everyone together, consider using the alternative Welcome Series Template.)
In the example above, we’ve built a filter based on job title. From here, C-suite level and operations team contacts each proceed down separate paths — and receive content that’s more geared to their specific needs.
6. Email: Send different emails with relevant articles to each of your filter groups. This is your chance to show each of your sub-audiences that your content will be highly relevant and targeted for their individual needs.
So ensure these recommendations are as targeted as possible: Use our website analytics solution to see which articles are most popular among each of your filter groups (in our ongoing example, you’d filter by each of your targeted job titles), then include them in your voyages.
Depending on your filters, you may have 2 different calls-to-action here as well.
7. Wait: Include another wait element between your second and third emails. Like the first, you can customize this based on your campaign needs.
8. Final Email: Wrap up your welcome series with one last email. You can use the same message for all of your filter groups, or adjust it depending on each sub-audience.
Don’t leave your audience hanging here. Give them something to do by including a clear “What’s next?” CTA. You could highlight an upcoming event, promote a featured article, or share content that the subscriber may need to pay for (e.g. a yearly report, special content, a membership option, etc.).
How will I know if my voyage was a success?
There are two ways you can measure the success of this welcome series. First, if your subscribers engage with your content, then you have satisfied the general goal of promoting engagement.
If you are using this campaign to promote the next step you’d like your subscriber to take, you can measure the success based on how many subscribers answered your Odyssey CTA. Use this as a baseline to establish the baseline for future campaigns.
Use either or both indicators to evaluate your success and adjust as needed. Some key variables include:
Subject Lines:Test your subject lines to see what yields the most clicks and conversions. Shorten your subject lines whenever possible: Our research shows that subject lines perform best when they’re under 20 characters. Whatever you choose, A/B test it on your audience: On Omeda, you can run A/B tests with up to 5 splits — so you’re only limited by your creativity here.
Filters: Create more filters to deliver more customized content to sub-groups of your audience. Also consider changing your filters. On Omeda, you can create segments using a combination of 100+ factors, so there’s no reason not to experiment here.
Recommended/Promoted Content: Review each email’s results to see where your audience stops engaging. If there is significant dropoff between emails, consider changing your content mix at that point.
CTAs
- A/B test your CTA messaging to maximize conversions.
- Streamline your email design to draw the reader’s eye to your CTA.
- Use Omeda’s Heat Map Report to see where your audience clicks most frequently, then organize your CTAs around those points.
- Use a single column layout to reduce cognitive load for your readers and make it easier for them to convert.
3. Re-Engagement V1: Valid Email Address
In this voyage, you’ll attempt to re-engage your inactive email subscribers with a series of three emails.
Goal: To have contacts who have opted into receiving emails, but who are not opening them, open and/or click on at least one email during the time this campaign is running.
Purpose: To assess/cleanse subscription lists by ensuring that there is still an active person on the other end. Generally, increases open rates & CTRs for subscriptions once this campaign has run.
Length of Campaign: ~2 weeks
Campaign Type: Continuous (monthly or bi-weekly)
Summary:
1. Audience: Query your audience for newsletter subscribers that have received X amount of emails within your desired timeframe. Exclude those who:
- Have invalid email addresses (Use our AtData integration to verify your audience’s email addresses)
- Were newly created (be it in the last X months, YTD, etc)
- Have opened at least one emails within your time range ‘
2. Schedule: Set up the date/time of the first set of contacts that you will push through this Odyssey. This will also be used to run the subsequent series’ (if you select this to run continuously).
3. Email #1/Personalization: Send your first re-engagement email that highlights a popular piece of content. For best results, make this different than the articles you’ve promoted recently.
At the same time, display a personalization element to trigger for anyone in the campaign that visits your website. In this pop-up, prompt your audience to confirm their email address.
4. Wait: Wait about six days before sending the next email. This lowers your risk for spam complaints or unsubscribes.
5. Filter: Before your email, use a filter to remove anyone that engaged with the previous email from your campaign.
6. Email #2/Personalization: Send another email to anyone that still hasn’t engaged. Entice them to re-engage by spotlighting some of your product offerings or upcoming content.
Also trigger a personalization reminding website visitors to update their email address. We recommend inserting a Dragon Form that prompts people to select their desired topics — use to make your email content more relevant and effective.
7. Wait: Wait another six days between emails.
8. Filter: Use another filter to remove anyone that has engaged with an email since your last send.
9. Email #3: Send a final email to anyone that still hasn’t engaged with your emails. Inform your audience that you will remove them from your list unless they resubscribe and include a prominent CTA.
10. Wait: Since you’re not sending any more emails in this campaign, you don’t have to wait as long before taking action. After 2 days, most activity that will happen is done.
11. Filter: Set the final filter as the same as the previous 2. For those that have engaged with any email, they have met the re-engagement criteria and are done.
12. Final Steps: Set up a personalization notifying your unengaged audience either 1) They’ve been unsubscribed or 2) prompt them to change their email preferences (this will tie in with the content you sent in email. Also export the list of your unengaged users or drop them onto an FTP site for further action.
13. Pathfinder: Continuing to email your unengaged users will hurt your engagement metrics and hurt your deliverability. Prevent this by dropping a pathfinder into Audience Builder. This way, you can exclude this audience from future emails more easily.
How will I know if my voyage was a success?
Evaluate your campaign on two factors: First, how many of your lapsed subscribers opened or clicked an email? This tells you how effective your content is in resparking your audience’s interest. (Monitor your link performance, clicks and conversions from each email to determine what kinds of content elicit the most interest and change course accordingly.)
Second, how much did your open, clicks and click-through rates improve upon removing inactive subscribers from your list? If you’re not happy with your performance lift, consider running your re-engagement campaigns more frequently, cleaning your email list, or making your criteria for “unengaged” more strict (adding someone to the campaign when they’re unengaged for one month rather than two, for example).
Once you run your first campaign, you’ll get a baseline that’ll set the standard for your next re-engagement campaigns. From there, you can set goals for the number of contacts you’d like to re-engage and improve your messaging to keep more people engaged going forward.
4. Re-Engagement V2: Invalid Email Address
Goal: Obtain an updated/new email address for subscribers with an invalid email address on file.
Purpose: To target current subscribers who have an email address marked as invalid in order that they can provide a new one so that they can continue to receive emails.
Length of Campaign: ~1 week/person
Campaign Type: Continuous
Summary:
- Audience: Select subscribers to a specific product who no longer have a valid email address on file. For best results, run a separate Odyssey for each specific brand and/or a singular product.
- Schedule: Set up the date/time of the first set of contacts that you will push through this Odyssey. This will also be used to trigger the subsequent series’ refresh dates (if you select this to run continuously).
- Personalization #1 / Facebook/IG: Display a website personalization telling users that their email address on file is no longer valid and prompting them to update their information. Embed a form field directly into the personalization, or use a button that redirects them to the profile page. You can also run a FB/IG ad at the same time: Here, promote the subscription that the consumer had opted in to receive.
- Wait: This is the only wait in this Odyssey and can be set to mimic the average behavior of your audience. If you have regular, recurring visitors, consider a shorter wait time. If recurring visits aren’t as common, wait a bit longer to ensure you’ve captured the best percentage of your audience.
- Filter: Once you’ve given your targeted audience enough time to visit your website and see the personalization element, use a filter to remove anyone that updated their email address from the campaign (4a). Also consider putting them back into a welcome series depending on your marketing strategy.
- Personalization #2 / Pathfinder / Export: Set up another personalization for anyone that didn’t respond to the first one. Take a softer tone this time: Show them their email and ask them to confirm if it’s still valid — or let them know they need to re-subscribe to get back on the list.
Additionally, you can mark this group of people with a pathfinder to easily identify and target them in new efforts later. Lastly, you can also choose to export these contacts without valid email addresses – potentially feeding them into another marketing effort
How will I know if my voyage was a success?
If, through this campaign, you have subscribers update their information and re-subscribe, your campaign will have been a success. Use the metrics from the initial run to establish a baseline of expectation that can be used to gauge success of future campaigns.
Not getting the desired metrics? Try adjusting the messaging of your personalization elements and make sure you have a clear CTA (e.g. “Your email address has expired, please provide your current email in order to continue receiving valuable content”).
Additionally, you can adjust the wait times to better match your audience behavior. You can always revisit your audience query as well to make sure it’s not targeting an audience segment that is too broad or too narrow.
5. Cross Promotion
In this voyage, you’ll cross-promote related publications or products to your audience through a combination of emails, website personalizations and ads. (Learn how to execute more effective up-sells and cross-promotions here!)
Goal: This will depend on the product you’re cross-promoting, but common metrics include click-throughs and increases in revenue.
Purpose: To promote a product or content piece from a paid advertiser
Length of Campaign: ~2 weeks
Campaign Type: Static
Summary:
1. Audience: Your audience will depend on the type of cross promotion that you are running. Query your audience based on relevant characteristics such as job function, location, type of product(s) purchased, etc.
2. Schedule: Set up the date/time of the first set of contacts that you will push through this Odyssey.
3. Email #1/FB: On schedule, the initial email will be sent out. In this email, highlight the content or product that you are cross-promoting. Identify and explore the pain point(s) that the promoted content/product addresses. You can simultaneously run a Facebook/IG campaign for maximum reach.
Once you send the email, wait ~2 hours (2a), then trigger a personalization that will display for anyone in your campaign that visits your website (2b). Promote the same content piece and/or CTA from your email.
To prevent your audience from seeing duplicate messages, you can limit this personalization. You can also drop a filter here depending on how reluctant you are to show the same message to people twice.
4. Wait: Wait three to seven days between emails, depending on how frequently you would like to target your newcomers. For this example and timeline, we set it to seven days.
5. Filter: Use a filter to remove anyone that opted in to the cross-promoted publication/product. (4a) Depending on how your cross promotion is set up, you can send qualified contact over to a new Odyssey (like a welcome series for the promoted publication or product).
6. Email #2: Send a second email to those that haven’t opted in. For the second email, consider a different design layout. If the initial email was a more creative HTML, pare your second down to a simpler text version. Much like the first round, you can set a short wait (5a), followed by a new personalization element (5b).
7. Wait: Wait five to seven days between emails. For this template, we have set it to 7 days.
8. Filter: Use another filter to remove any new opt-ins from your campaign. (7a)
9. Email #3 / FB: Send a final email to anyone that still hasn’t opted in. Try a more direct approach here: Speak to your audience’s common pain points and how your promoted item can address them. (7b) At the same time, you can push them to FB/IG. (8)
How will I know if my voyage was a success?
A successful cross promotion will benefit both your brand and the one that you are promoting. Depending on the call to action, you will have different ways to measure success. Using this initial Odyssey will also establish a nice baseline against which to measure future Odysseys.
Evaluate your campaign regularly. If you’re not happy with your performance, adjust both the messaging and the patterning of the elements in order to find what works best for your brand and audience.
Subscribe to our newsletter
Sign up to get our latest articles sent directly to your inbox.